Saturday, May 5, 2012

Korres Silicone Free Face Primer: Review, Photos & Swatch

Hey Sweeties, how is your weekend going so far? :)

The Korres Silicone Free Face Primer is one off Korres's best selling products and its a natural makeup primer with nourishing antioxidant vitamin E, skin-smoothing Jojoba oil, Melissa water, and Edelweiss extract. Its formulated without silicone, parabens, sulfates, synthetic dyes/fragrances, mineral oils, petrochemicals, phthalates, and GMOs. This is a primer that is actually good and healthy for your skin :)

♥ Korres Silicone Free Face Primer.

I have been using this primer for about a year now and I absolutely love it. This was actually recommended to me by a few off my lovely blog readers. At first, I only picked up a little sample size but after falling in love with it, I went back on Ebay and bought the 30ml tube and I don't regret it for a second because this is a wonderful product.
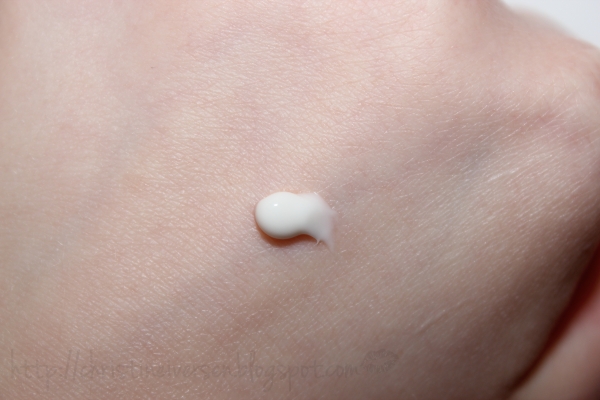
♥ Korres Silicone Free Face Primer.

♥ Korres Silicone Free Face Primer.

The Korres Silicone Free Face Primer has a white and creamy texture which feels more like a moisturizer than a primer and it doesn't leave my skin feeling greasy which I really like. It absorbs quickly into my skin and my face seems to be a lot smoother and even after I have used it. It has a light citrus scent which I love and find very refreshing.

The Korres Silicone Free Face Primer makes my makeup glide on so smoothly, stays put the whole day and makes my makeup look fresh throughout the day. It makes my makeup last longer and it prevents my foundation from setting into my fine lines. Because its mineral oil free, it won't clog your pores or cause breakouts! Hooray :)

♥ Korres Silicone Free Face Primer.

The packaging off the Korres Silicone Free Face Primer is very simple but effective because it allows you to use up everything and don't waste any product.The only ''negative'' thing I have to say about this product, is the price. Its $28 for a 30ml tube which may sound a little expensive for just one primer.

I personally don't mind the price because I like to spend my money on products that I know is good and that I know I will use up. When it comes to face primers, foundations and skin care products, I don't mind paying a little extra money for good quality products :)

I used to use the Smashbox Photofinish Face Primer and it broke me out every time I used it. My skin is very sensitive to silicone so I try to stay away from those. I have used the Mineral Infused Face Primer by Elf Cosmetics which is very similar to the Smashbox Photofinish Face Primer and I haven't experienced any bad reactions with that one. Weird, huh?  

I think the Korres Silicone Free Face Primer is a really good primer and I highly recommend that you check it out if you have dry/normal skin. Its a very moisturizing primer which you can use alone or over your favorite moisturizer. A little goes a long way with this primer :) 

Rating: 5/6
Where to buy? 
The Korres Silicone Free Face Primer is available on korresusa.com for $28. For those off you who live in the US, you can find this at Sephora for $28 as well. I also found it on Ebay for only $13.99 + shipping, so definitely check that out if you want to save a little money. Here is the link to the Ebay seller :)

Have you tried out this face primer from Korres? Do you have a favorite face primer? Thank you for stopping by and leaving a comment :) Xoxo, Christine♥

Friday, May 4, 2012

Tutorial: How To Create Converse Shoe Nails

Hey Sweeties :)
This Tutorial is inspired by Converse shoes. I wear Converse shoes a lot during the summer because they are really comfortable and they come in so many cute colors and patterns. I just saw pictures off the Pastel Collection and I absolutely love the colors. I need the mint green pair!!!!! 

I hope you like this Tutorial, to learn how you can create fun Converse shoe nails, just keep reading :)

 ♥ 1. Start off by applying a base coat to protect your nails from staining. When your base coat have dried, go ahead and paint all off your nails black. 

 ♥ 2. Take a white nail polish and swipe it across the tip off your nails like this. You might have to go over the tip a few times to get it to look opaque.


♥ 3. Take your silver nail polish and your dotting tool and create six small dots on each side.

♥ 4. Now we are going to work on our shoe laces. Take your white nail polish striper and start connecting the dots like this.


♥ 5. Take your dotting tool and place a small black dot off nail polish  inside the silver dots.

 ♥ 6. Create a thin, curved black line across the white tip to complete this look. Finish off your design with your favorite top coat to protect it from chipping away.

 Products I used: 
♥ NYX Ridge Filler Base Coat.
♥ L.A. Colors Nail Polish Striper in Black.
♥ L.A. Colors Nail Polish Striper in Silver Glitter. 
♥ Elf Cosmetics Nail Polish in White.
♥  Seche Vite Dry Fast Top Coat.

Here is the finished look, what do you guys think? I really like this design a lot, I think its really cute! This is definitely the most difficult design that I have created so far and I'm not 100% happy with how it turned out. I definitely need a little more practice when it comes to this design :)

If you think its a too much with having the Converse shoe design on all off your nails, try painting your nails black and just create the design on your ring finger for a more toned down look. Its very wearable and it looks super cute :)

What do you think about this design? Will you be trying it out? Thank you for stopping by and leaving a comment :) Xoxo, Christine♥

Thursday, May 3, 2012

NYX Powder Blush in Angel: Review, Photos & Swatch

Hey Sweeties, how are you guys doing? :)
I have another requested post to share with all off you tonight. The lovely Linny from schmuckstueck asked me if I could share swatches off the NYX Powder Blush in Angel. I decided to do a review and share my opinion on this lovely blush with all off you :)

Please keep your blog post request coming, I love to hear back from you :)

♥ NYX Powder Blush in Angel.

The NYX powder blushes are available in 24 different shades and delivers sheer, silky color that glides on, blends beautifully and creates a natural glow. 

Angel is a beautiful light rose-pink blush that give your cheeks a fresh and natural look. Its very soft and velvety and it blends beautifully on the skin. Its definitely a gorgeous and perfect blush for everyday use.


♥ NYX Powder Blush in Angel.

When it comes to the pigmentation, Angel has the best of both worlds. Its pigmented but not too pigmented that you have to use a light hand when you apply it. I actually like that in a blush because that allows me to layer on the color without over doing it. Its better to apply a little at first and then go back and apply more if you feel like you need a little extra color on your cheeks.

When you look at the blush, you can see that it has a little shimmer but its nothing big and it wont even show up on the skin. Angel is a little chalky but nothing too extreme.

♥ NYX Powder Blush in Angel.

I really like the packaging off the NYX blushes, its very practical. The blushes come in a large square pan with a quilted surface. The lid flips up and has a clear cover so you can tell what color it is inside. I really love that about these blushes, its so easy to tell what color each blush is. I wish all blushes had these clear covers :)

The only thing I don't like about the packaging is that the clear lid that protects the blush is very fragile. It can easily break if you throw it in your makeup bag or in your purse so remember to be a little careful with it. If it breaks, you can always glue it back together though :)

♥ NYX Powder Blush in Angel. 

If you have fair/light skin, Angel is a perfect blush for you. Its going to give you such a natural, gorgeous flush off color to the cheeks. If your skin is darker, I'm not sure if Angel is going to show up on your skin.

Angel is one off those blushes that I instantly pick up if I don't know what blush to wear, its just the perfect blush for everyday. I highly recommend that you give it a try because I think that you are going to love it as much as I do :)

Rating: 4/6
 Where to buy?
Angel is available on Nonpareilboutique for $4.50. They are currently having 25% off on all NYX products and that means that you can get Angel for only $3.37 which is a really good deal. Its also available on Cherry Culture. They are having 40% off selected NYX products so definitely check that out :)

Click here to check out Nonpareilboutique and here to check out Cherry Culture. You can also find Angel in stores that sell NYX Cosmetics.

 Have you tried any off NYX's blushes? Which one is your favorite? Thank you for stopping by and leaving a comment :) Xoxo, Christine♥

Wednesday, May 2, 2012

Milani Baked Blush in Berry Amore: Review, Photos & Swatch

Hey Sweeties :)
The lovely Lau from hananoire's blog asked me if I could share swatches off the Milani Baked Blush in Berry Amore that I recently featured in my ''whats in my makeup bag'' post. I thought this would be the perfect time to do a review and share this gorgeous blush with all off you :)

 ♥ Milani Baked Blush in Berry Amore.

Berry Amore is a luxurious powder blush that features a mélange infusion of colors baked on Italian terracotta tiles. Berry Amore is a beautiful rosey, golden blush which I absolutely love.   

Berry Amore is one off my favorite blushes from Milani. Its a good quality blush that is very affordable and it gives such a gorgeous glow to the cheeks. It has a silky smooth application that leaves your face looking healthy and glowy.

This is a blush that is going to look very pretty on a lot off different skin tones. I think it will look stunning if you have tanned, medium brown skin because it will give you that gorgeous  sun kissed look. 

 ♥ Milani Baked Blush in Berry Amore.

Berry Amore is highly pigmented so if you have pale/light skin, be sure to only use a little amount off product and just go back and build it up if you want more color on your cheeks. We don't want to look like a bunch off circus clowns, do we now? :) 

 ♥ Milani Baked Blush in Berry Amore.

 ♥ Milani Baked Blush in Berry Amore.

I absolutely love the gold veining that Berry Amore has, its absolutely stunning, don't you think so too? :)

 ♥ Milani Baked Blush in Berry Amore.

I really like the packaging off Milani's Baked Blushes. You get a little mirror and a brush applicator which is hidden below the compact. I never use the brush applicators that comes with makeup products, but they can be quite handy to have if you are traveling and you don't want to take a bunch off brushes with you. 

 ♥ Milani Baked Blush in Berry Amore.

Berry Amore shows up more like a pinky coral on my skin which I love but I think the name can be a little deceiving. 

Milani's Baked Blushes are some off the best blushes that I have tried. Not only are they affordable but they are crazy pigmented. If you don't want to spend your money on blushes from MAC and NARS, these are great alternatives. I only wish they had more colors to choose from :)

Rating: 5/6

Where to buy?
The Milani Baked Blushes are available on Milani's website and also on Cherry Culture
in 9 different, gorgeous shades. Their baked blushes are currently on sale on Cherry Culture for $6.99 each. Here is the link if you are interested in picking up a few shades.

If you love love glowy, shimmery blushes, I highly recommend that you pick up a few before the sale ends or it sells out :)

Have you tried any off Milani's Baked Blushes? What do you think about them? Thank you for stopping by and leaving a comment :) Xoxo, Christine♥

My April Favorites

Hey Sweeties :)
I can't believe we are in May already, can you? Where has the time gone? Summer is coming up and so is my birthday and I'm really looking forward to start wearing Summer clothes again. Its still pretty cold here and its actually snowing today, crazy, huh?

I have been loving a bunch off products for the month off April and I showed quite a few off them in my 'whats in my makeup bag' post that I recently shared with you. If you missed it, you can check it out here :)
 ♥ Revlon ColorStay Foundation. 

 ♥ EOS Lip Balm in Strawberry Sorbet. 

 ♥ Revlon Lip Butter in Berry Smoothie. 
Click here to check out my review. 
 
 ♥ Milani Baked Blush in Berry Amore. 

 ♥ L'Occitane Almond Shower Oil.
Click here to check out my review. 

 ♥ The Body Shop Vanilla Body Lotion. 
Click here to check out my review. 

♥ Jennifer Lopez Love at First Glow Perfume.

 ♥ Enrapture Encode Totem Styler. 
Click here to check out my review.

If you want me to do reviews on any off these products, please let me know in the comments below. I would love to hear back from you :)

Which prducts have you been loving for the month off April? Any recommendations? Thank you for stopping by and leaving a comment :) Xoxo, Christine♥

Tuesday, May 1, 2012

Tutorial: How To Create Strawberry Nails

Hey Sweeties :)
I was eating strawberries the other day and I thought to myself, how fun wouldn't it be to do a strawberry nail tutorial? I can't believe that May is already here and that means that Summer is right around the corner. Hopefully this fun and cute design will get you in the Summer mood :)

If you want to learn how you can create these cute and fun Strawberry nails for Summer, just keep reading :)

 ♥ 1. Start off by applying a base coat to protect your nails. 

♥ 2. Paint your nails with a strawberry red nail polish.

♥ 3. Now, we are going to work on the strawberry leafs. Take a green nail polish and your nail polish striper and paint 4-5 triangles and then fill them in. Since the green nail polish that I'm using is very sheer, I used a white nail polish first because that is going to make the green color pop and look a little bit brighter.

♥ 4. Now its time to add the strawberry seeds. Strawberries have yellow seeds, so go ahead and pick your favorite yellow nail polish. I used a dotting tool to draw the seeds, but you can also use a toothpick :)

♥ 5. Finish off your design with your favorite top coat to protect it from chipping away.


Here is the finished look. What do you think? I'm not completely happy with how it turned but the design is still super cute. I love doing these nail art tutorials so if you have any requests on different nail looks you want me to do, please leave them in the comments below :)

 Products I used: 
♥ NYX Ridge Filler Base Coat.
Essie Nail Polish in Lolipop.
♥ China Glaze Nail Polish in Entourage.
♥ China Glaze Nail Polish in Lemon Fizz.
♥ L.A. Colors Art Deco Nail Art Striper in White.
♥ Seche Vite Top Coat.

 What do you think about the design? Will you be trying it out now that the Summer is right around the corner? Thank you for stopping by and leaving a comment :) Xoxo, Christine♥
 

water healthy power Copyright © 2012 -- Powered by Blogger